How to setup an open source Data Science environment with Python and R. Part 1/2
VirtualBox 6 on Windows host machine. Ubuntu Desktop 18.04.2 LTS under VirtualBox. Docker container with Jupyter image. Python and R Jupyter kernels.

Table of Contents
- VirtualBox
- Ubuntu under VirtualBox
- Ubuntu settings in VirtualBox
- Ubuntu configuration (part 2)
- Docker CE for Ubuntu (part 2)
- Jupyter (part 2)
VirtualBox
Navigate to https://www.virtualbox.org/wiki/Downloads and download the newest stable VirtualBox platform package and VirtualBox extension pack. Idea is set up VirtualBox on Windows host. So, click Windows hosts link first and All supported platforms link second.
In my case, for Windows host machine, I use VirtualBox-6.0.4–128413-Win.exe and Oracle_VM_VirtualBox_Extension_Pack-6.0.4.vbox-extpack files.
Install and open VirtualBox. Click New button:

Type virtual machine name to Name field (e.g., Ubuntu Desktop 18.04.2 LTS). Select path for VirtualBox files (e.g., C:\Users\medium\VirtualBox VMs). Select Linux in Type dropdown and Ubuntu (64-bit) in Version dropdown. Click Next:

Select minimum 2 GB system memory (2048 MB). In my case, for laptop with 16 GB, I use 8 GB (8192 MB). Click Next:

Select Create a virtual hard disk now option and click Create:

Select VDI (VirtualBox Disk Image) option and click Next:

Select Fixed size option and click Next:

Select minimum 25 GB of free hard drive space. I can strongly recommend 60 GB and SSD. Click Create:

Finally, you can see Ubuntu Desktop 18.04.2 LTS virtual machine like below:

Ubuntu under VirtualBox
Navigate to https://www.ubuntu.com/download/desktop. Download the newest Ubuntu Desktop x64 iso image (~1.86 GB). In my case is Ubuntu Desktop 18.04.2 LTS and ubuntu-18.04.2-desktop-amd64.iso file.
Open VirtualBox, select Ubuntu Desktop 18.04.2 LTS virtual machine (see image above) and click Start button.
Note: Hardware virtualization must be enabled in your host machine’s BIOS.
Select iso image (e.g., ubuntu-18.04.2-desktop-amd64.iso) and click Start:

Select your language (e.g., English) and click Install Ubuntu:

Select your keyboard layout (e.g., English (US)) and click Continue:

Select Normal installation option. Select Download updates while installing Ubuntu and Install third-party software for graphics and Wi-Fi hardware and additional media formats checkboxes. Click Continue:

Select Erase disk and install Ubuntu option. Click Install Now:

Click Continue:

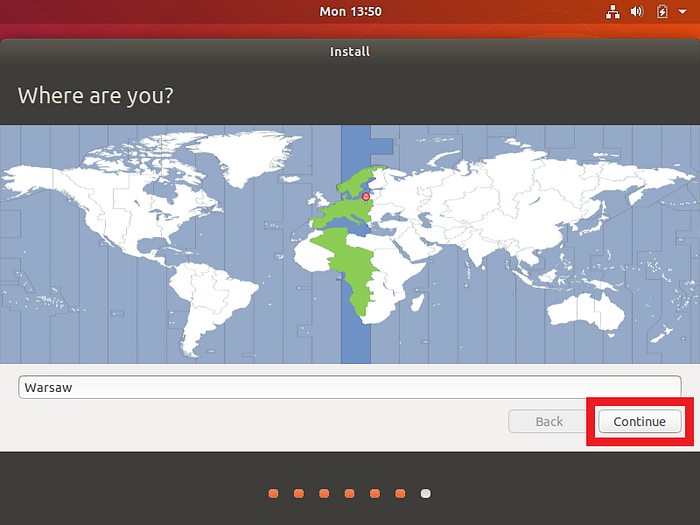
Select your location (e.g., Warsaw) and click Continue:
Enter your full name to Your name field (e.g., Medium). Type your computer’s name to Your computer's name field (e.g., pc-medium). Enter username to Pick a username field (e.g., medium). Enter password. Select Require my password to log in option. Click Continue:

Click Restart Now:

Select Machine VirtualBox menu option. Next, select ACPI Shutdown option (Host + H shortcut).
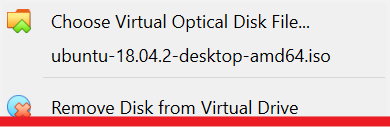
Navigate to VirtualBox. Select Ubuntu Desktop 18.04.2 LTS virtual machine and click Settings button. Select Storage tab. Select iso image and click optical disk icon:

Click Remove Disk From Virtual drive, if available:
Install VirtualBox extension pack (e.g., Oracle_VM_VirtualBox_Extension_Pack-6.0.4.vbox-extpack):

Ubuntu settings in VirtualBox
Navigate to VirtualBox. Select Ubuntu Desktop 18.04.2 LTS virtual machine and click Settings button.
General. Select General tab. Select Basic subtab. Verify Type and Version values:

Select Advanced subtab. Set Shared Clipboard and Drag'n'Drop as Bidirectional:

System. Select System tab. Select Motherboard subtab. Verify RAM size. Set up Boot Order to Hard Disk first and Optical second:

Select Processor subtab. Select minimum 2 CPUs in Processor(s) field. Select Enable PAE/NX option:

Select Acceleration subtab. Select KVM in Paravirtualization Interface dropdown:

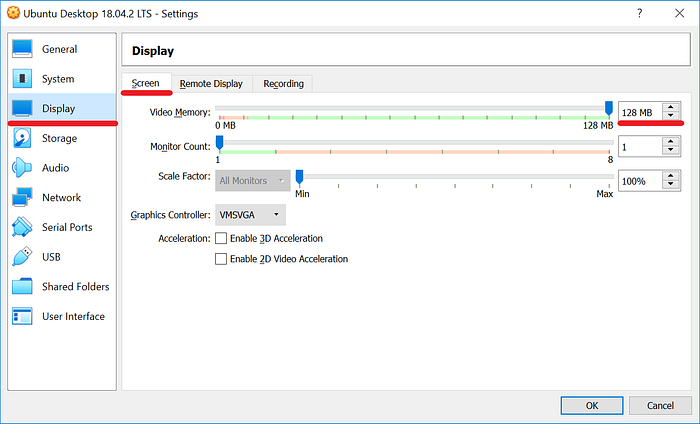
Select Display tab. Select Screen subtab. Set up Video Memory to 128 MB:
Select Storage tab. Select your vdi file (e.g., Ubuntu Desktop 18.04.2 LTS.vdi). If you use SSD, select Solid-state Drive option:

Select Audio tab. Setup Audio Controller to Intel HD Audio. Select Enable Audio Input option:

Network. Select Network tab. Select Adapter 1 subtab. Keep the settings as default:

Select Adapter 2 subtab. Select Enable Network Adapter option. Set up Attached to to Host-only Adapter. Click Advanced. Select Allow VMs option in Promiscuous Mode dropdown:

Select USB tab. Select your USB type. USB 3.0 (xHCI) Controller in my case. Click OK:

Select Ubuntu Desktop 18.04.2 LTS virtual machine and click Start button:

Log in to Ubuntu and finish introduction. Final result look like below:

